EN
EN



The Three Categories That Define Roadside Safety
Every roadside safety barrier falls into one of three broad categories based on how it responds to an impact: flexible, semi-rigid, or rigid. The classification isn't just academic—it determines where the barrier can be installed, how much space it needs, what kind of vehicles it can contain, and what happens to the occupants during a crash.
The fundamental distinction comes down to deflection. A flexible barrier moves a lot—sometimes several meters—and absorbs energy through tension in wire ropes or cables. A rigid barrier barely moves at all and absorbs energy through the crushing of the vehicle structure. A semi-rigid barrier falls in between, typically using steel beams that bend and deform to manage impact forces.
Each type has clear advantages and equally clear limitations. The right choice depends on the site constraints, the traffic mix, and the consequences of a barrier failure.
Flexible Barriers: Wire Rope and Cable Systems
Flexible barriers are made from tensioned wire ropes or cables supported by frangible posts that break away on impact. When a vehicle hits a flexible barrier, the cables stretch and the posts snap, allowing the barrier to deflect significantly—often 1.5 meters or more. That large deflection spreads the impact force over a longer time and distance, which translates to lower deceleration forces on the vehicle occupants.
The crash severity data supports this. A study analyzing five years of crash data from Iowa found that cable barriers were associated with the lowest injury levels among the three types. Concrete barriers, by comparison, were associated with a 12.09% higher probability of injury, and guardrails with a 7.69% higher probability, relative to cable barriers.
But the advantages come with trade-offs. Flexible barriers require significant clear space behind them—the working width can be several meters. That makes them unsuitable for constrained sites like bridge decks, median strips with limited width, or locations adjacent to fixed obstacles. They also require substantial repair after any significant impact because the posts are designed to break. A single crash can take a flexible barrier out of service until the entire damaged section is replaced.
Rigid Barriers: Concrete Walls That Don't Budge
At the opposite end of the spectrum are rigid barriers—almost always made of reinforced concrete. These barriers deflect minimally, typically less than 50 millimeters, and rely on the vehicle's own structure to absorb the impact energy through crushing.
Rigid barriers are the go-to choice when there's absolutely no room for deflection. Bridge parapets, tunnel walls, and median barriers in constrained urban freeways are almost always rigid because the barrier itself defines the available clearance. They also require virtually no maintenance after minor impacts—a concrete barrier that stops a car doesn't need to be replaced.
The downsides are significant. The high deceleration forces transmitted to occupants mean that rigid barriers are associated with the highest injury risk among the three types. Vehicle peak acceleration in a 45-degree, 80 km/h test was 32g with a stiff concrete barrier, compared to 18g with a W-beam barrier and 7g with a flexible wire rope barrier. That's a brutal statistic—32g is well beyond what most occupants can survive without serious injury.
Rigid barriers also pose a particular risk to motorcyclists, who lack the protective structure of an enclosed vehicle. For that reason, many jurisdictions restrict rigid barriers to locations where the safety benefits of containment outweigh the higher severity for vulnerable road users.
Semi-Rigid Barriers: The W-Beam and Thrie-Beam Middle Ground
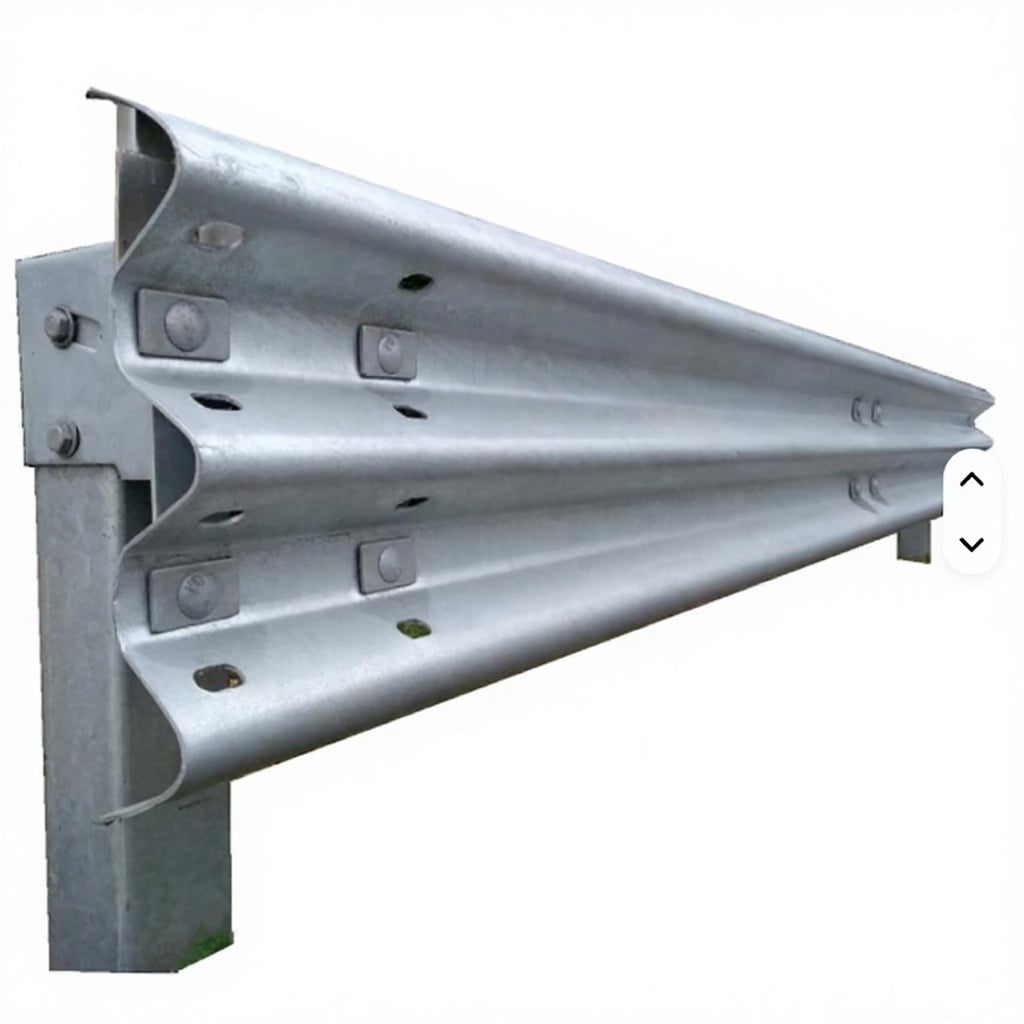
Semi-rigid barriers—primarily steel beam guardrails—represent the most common compromise between deflection and containment. The classic W-beam guardrail, with its distinctive corrugated profile, deflects typically 0.8 to 1.3 meters under impact, absorbing energy through plastic deformation of the steel.
The performance sits between the other two types. Semi-rigid barriers deflect less than flexible barriers, so they can be placed closer to hazards when space is limited. They deflect more than rigid barriers, so occupant deceleration is lower than with concrete. The injury probability data from the Iowa study puts guardrails at 7.69% higher injury risk than cable barriers, but lower than concrete's 12.09%.
Semi-rigid barriers are also the most repairable. A damaged section of W-beam can be unbolted and replaced without replacing the entire system. Posts that bend can be straightened or swapped out. This repairability matters enormously on high-traffic roadways where a barrier outage creates a safety hazard that has to be addressed quickly.
| Barrier Type | Typical Deflection | Occupant Deceleration | Space Required Behind | Post-Impact Repair |
|---|---|---|---|---|
| Flexible (Cable) | 1.5–3.0 m | Lowest (7g in 80 km/h test) | Largest—several meters | Extensive—post replacement |
| Semi-Rigid (W-Beam) | 0.8–1.3 m | Moderate (18g in 80 km/h test) | Moderate—1–2 meters | Section replacement |
| Rigid (Concrete) | <0.05 m | Highest (32g in 80 km/h test) | Minimal—essentially zero | Minimal—usually none |
The "Dynamic Deflection" and "Working Width" Distinction
Engineers distinguish between two related but different measurements: dynamic deflection and working width. Dynamic deflection is the maximum displacement of the barrier face during impact. Working width is the distance from the pre-impact face of the barrier to the furthest deformation of any part of the system after impact.
For a flexible barrier, the working width can be substantially larger than the dynamic deflection because broken posts and displaced cables can project outward. For a rigid barrier, the two numbers are essentially identical because nothing moves.
This distinction matters for site selection. A barrier with a large working width can't be installed where there's an obstacle—another barrier, a bridge pier, a retaining wall—within that distance. Many roadside designers have learned this lesson the hard way, specifying a barrier that performs beautifully in crash tests only to discover it doesn't fit the available roadside space.
Choosing the Right Barrier: It's Never Just About Performance
The selection process for a safety barrier involves balancing performance metrics against site constraints in a way that no single "best" type can satisfy everywhere.
Flexible barriers are the right choice on wide medians and roadsides with ample recovery space, especially where minimizing occupant injury is the top priority. They're also often the most cost-effective for long runs of roadside protection because the cable and post system uses less material than continuous steel beam.
Semi-rigid barriers work well in the vast middle ground—most highway medians, bridge approaches, and roadsides with moderate clearance. The W-beam system is the global standard for a reason: it balances cost, performance, and repairability better than any other single option.
Rigid barriers are the only choice when there's literally no room for deflection. Bridge parapets, tunnels, and urban freeways with zero shoulder width are rigid by necessity, not by preference.
One often-overlooked factor is the transition between different barrier types. A sudden change from a flexible cable barrier to a rigid concrete wall creates a stiffness mismatch that can cause vehicles to snag or penetrate at the transition point. Proper transition designs—gradual stiffness changes over a distance of several meters—are critical to maintaining system integrity.
Manufacturers like STL Sun that produce both guardrail components and structural steel products understand this systems-level thinking. A barrier is only as good as its weakest link, and that link is often the connection between different barrier types or the anchorage at the ends. The hardware matters, but so does the integration.
Table of Contents
- The Three Categories That Define Roadside Safety
- Flexible Barriers: Wire Rope and Cable Systems
- Rigid Barriers: Concrete Walls That Don't Budge
- Semi-Rigid Barriers: The W-Beam and Thrie-Beam Middle Ground
- The "Dynamic Deflection" and "Working Width" Distinction
- Choosing the Right Barrier: It's Never Just About Performance