EN
EN



The Rosette Is the Heart of the System
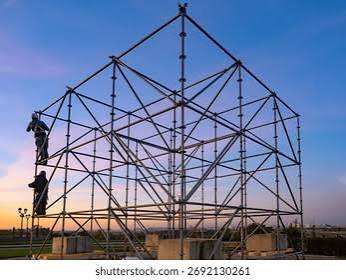
Ringlock scaffolding gets its name from the ring-shaped connection node—the rosette—that sits at the heart of every joint. Understanding how this connection works is the key to assembling a tower that's safe, stable, and efficient.
The rosette is a steel disc welded to the vertical standard at regular intervals—typically every 0.5 meters. It has eight punched holes: four small holes and four larger ones. The small holes accept horizontal ledgers and transoms; the larger holes accommodate diagonal bracing. This arrangement allows connections at 45-degree increments, providing 360-degree flexibility.
The genius of the rosette connection is the wedge mechanism. Horizontal and diagonal members have forged heads with captive wedges. Slide the head onto the rosette, insert the wedge into the aligned hole, and drive it home with a hammer. That's it. The wedge self-locks under load—the more weight applied, the tighter the connection becomes.
What You Need Before the First Standard Goes Up
Assembly starts before the first piece of steel touches the ground. Site preparation matters more than many crews realize.
Ground conditions determine the stability of the entire tower. The base must be level and compacted. Bearing capacity should be verified—soft ground requires base plates or sole boards to distribute the load. Adjustable jacks (screw jacks) compensate for minor unevenness, but they can't fix a fundamentally unstable foundation.
Component inspection is equally critical. Check every standard, ledger, and diagonal for damage. Bent members, cracked welds, or deformed rosettes compromise the structural integrity of the tower. Wedges should move freely in their heads—stuck wedges mean connections that won't fully engage.
Layout marking saves time during erection. Mark the grid positions based on the design layout before bringing materials to the site. This prevents the chaos of repositioning heavy components later.
Step-by-Step: From Base Jacks to the First Tier
The assembly sequence follows a logical progression from the ground up.
Step 1: Install the base jacks. Position screw jacks at each marked grid point. The socket collars face upward on the screw jacks, with complete engagement on the jack's load-bearing surface. Level the jacks so the first tier of standards sits perfectly plumb.
Step 2: Set the starter standards. Insert the first vertical standards into the socket collars. Verify bottom contact through the inspection holes. Starter standards are only used for the base tier—regular standards go above. This distinction matters because starter standards have different socket configurations.
Step 3: Connect the base tier ledgers. Take a horizontal ledger and slide its forged head onto the rosette of a standard. Align the wedge with the rosette hole. Drive the wedge with a hammer until it's fully seated. Repeat for all ledgers in the first tier. The bottom longitudinal and transverse ledgers restrict displacement of the standard bases.
A 500-gram hammer is the recommended tool for driving wedges. Heavier hammers can damage the components; lighter ones won't seat the wedge properly.
Building Upward: Adding Tiers and Bracing
Once the first tier is complete and squared, the tower grows upward.
Step 4: Add the next tier of standards. Engage the next standards into the sockets of the tier below. The standards should be continuous to the base plate. Pinned joints between standards are recommended for positive connection.
Step 5: Install ledgers at each new rosette level. The process is identical to the base tier—slide, align, wedge, hammer. Work systematically around the tower to maintain stability. Don't install all ledgers on one side before doing the opposite side; the tower needs balanced bracing to stay upright.
Step 6: Install diagonal bracing. This is where the large holes in the rosette come into play. Insert the bracing ends into the rosette's large holes until they contact the standards. Secure with wedge pins. Critical point: diagonals are direction-specific and must not be reversed. Installing a diagonal backward compromises the intended load path.
Diagonals should be installed in a uniform rotational sequence. This ensures consistent bracing throughout the tower. Install diagonals as work progresses, not afterward—a tower without bracing is unstable at every stage of assembly.
What Makes a Rosette Connection Work—and What Doesn't
The rosette connection's reliability depends on proper technique. A wedge that's only partially driven isn't a connection—it's a hazard.
The connection is considered fully made when the wedge is driven flush with the head. The hammer should bounce slightly on the final strike—that indicates the wedge is fully seated. Loose connections allow movement under load, which leads to premature wear and potential failure.
| Connection Element | Correct Practice | Common Mistake |
|---|---|---|
| Wedge seating | Driven flush with hammer | Left loose or only partially driven |
| Rosette cleanliness | Free of concrete, debris, paint | Coated or filled, preventing full engagement |
| Ledger alignment | Square to standard | Angled or forced into position |
| Bracing installation | Installed as work progresses | Added after tower is fully erected |
| Component condition | Straight, undamaged | Bent members or cracked welds used anyway |
The rosette has four narrow holes and four larger holes. The narrow holes accept ledgers; the larger holes accept diagonal bracing. Mixing them up—putting a ledger in a large hole or a diagonal in a narrow hole—creates a connection that doesn't fit properly and won't carry the intended load.
Common Mistakes That Compromise the Tower
Field experience reveals patterns of errors that show up repeatedly on ringlock jobs.
Rushing the base tier. The first tier establishes the geometry for everything above. If the base isn't level or the standards aren't plumb, the entire tower leans. Correcting this after several tiers are up means dismantling and starting over.
Skipping bracing. Diagonals are essential for lateral stability. A tower that looks stable in calm conditions can sway dangerously under wind or dynamic loads. OSHA's scaffolding standard (1926.451) addresses stability requirements, and while the specifics vary by height and configuration, the principle is universal: unbraced towers fail.
Using damaged components. A bent standard might still fit into the socket. A deformed rosette might still accept a wedge. But compromised components reduce the tower's load capacity and create unpredictable failure points. The cost of replacing a damaged member is trivial compared to the cost of a collapse.
Overloading platforms. Ringlock systems have specified load capacities per platform level. Exceeding these limits stresses the connections and the standards. The rosette connection is strong, but it's not unlimited.
When Ringlock Makes Sense—and When It Doesn't
Ringlock isn't the right choice for every job, and acknowledging that is part of making good decisions.
The system excels on projects that require complex geometries, varying elevations, or high load capacities. The 360-degree connection flexibility allows the tower to follow curved or irregular building profiles. The speed of assembly—fewer components, intuitive connections—makes it attractive for projects with tight schedules.
But ringlock has limitations. The rental cost is typically higher than frame scaffolding. The learning curve is steeper—crews need training on the rosette connection method. For simple, repetitive layouts with consistent elevations, traditional frame scaffolding might be more cost-effective.
The decision should be based on project requirements, not habit. A crew that's comfortable with ringlock might default to it for every job, but that doesn't mean it's the best choice for every job.
A petrochemical facility in Texas used ringlock for a turnaround project that required access around dozens of vessels and piping runs at varying elevations. The flexibility of the rosette connections allowed the scaffolding to weave through the congested layout without interfering with existing equipment. The crew completed the erection in about 60 percent of the time estimated for tube-and-clamp scaffolding. But for the adjacent warehouse expansion—a simple rectangular structure with consistent floor-to-floor heights—they used frame scaffolding. Different tools for different jobs.
STEEL Shanghai Import & Export Co., Ltd. manufactures ringlock scaffolding components to international specifications, with rosette connections engineered for consistent engagement and load transfer across the full range of standard configurations.
Table of Contents
- The Rosette Is the Heart of the System
- What You Need Before the First Standard Goes Up
- Step-by-Step: From Base Jacks to the First Tier
- Building Upward: Adding Tiers and Bracing
- What Makes a Rosette Connection Work—and What Doesn't
- Common Mistakes That Compromise the Tower
- When Ringlock Makes Sense—and When It Doesn't